Showing posts with label high school. Show all posts

Wednesday, September 17, 2014

QUICK Pot Roast & Stir Fry

Here are two really quick meals you can make with almost zero prep time, zero cook time, zero clean up time. That's right. Perfect meals for a busy teacher or anyone else looking for something delicious in a hurry.
Crock-pot Pot Roat
What you'll need:
  • 2 lbs of chuck roast
  • 1 pkg. of onion soup mix
  • 14 oz. of beef stock
  • 2/3 cup of water
  • 1 medium onion
  • Handful of baby carrots
  • Handful of celery (quartered)
  • 8 small red potatoes
The night before I made this pot roast, I prepared my vegetables by chopping them. I left them in a tupperware container overnight so when I woke up I could throw it in and head off to school.

I combined all of my ingredients in the crock pot: meat first, vegetables, onion soup mix, then beef stock. 


Cover your crock pot and cook on LOW for approximately 8-10 hours. I put mine in at 6:30 AM and by the time I returned home from school at 5 PM, it was PERFECT. My house smelled delicious and I was ready to eat.
I served the pot roast over egg noodles.
After we were finished, I placed all of the leftovers in a tupperware container and then thickened my gravy for lunch the next day. I added 2 tablespoons of flour directly into the leftover "juice" in the crock pot and whisked it together until it thickened.

Stir Fry
What you'll need:
  • 1/2-3/4 pound of chopped meat (mine was leftover from my Mexican Stuffed Peppers)
  • 1/4 cup of chopped onion
  • 1 zucchini
  • 1 sqaush
  • 1 bag of raw "stir fry vegetables"
  • White rice (I used Uncle Ben's again)
  • Soy sauce (to taste)
Slice your zucchini, squash, and onion. 

Place your zucchini, squash, and onion in a skillet with some oil to sautee over medium high heat. I like to add garlic salt, paprika, and pepper to my veggies.

After vegetables have begun to sautee, add raw stir fry vegetables and one cup of water. Place the lid over the pan and allow vegetables to simmer for about 10 minutes. Lower the heat and add about 1/3 cup of soy sauce. I tend to use less because I don't like it saturated.

At this point, I added my 90 second rice to the microwave. I added the rice and leftover, cooked chopped meat to the skillet, stirring until fully mixed and covered in soy sauce.


Dinner is done! The great thing about this recipe is that it "stretches" the leftover chopped meat but you still wind up feeling really full from all of the vegetables. I had enough leftovers for lunch tomorrow, again!

With one day left in my Four Day Dinner Challenge, stay tuned for tomorrow's Crock-pot Buffalo Chicken! :)

Monday, September 15, 2014

Four Day Dinner Challenge

I spent all day at a training with a substitute in my classroom. Tomorrow I will have a sub in my class in the afternoon while I spend half of my day grading our first writing performance assessment and on Friday I will have a sub in my class for the afternoon while I travel to Orlando to chaperone a trip. My boyfriend coaches football practice until 6 PM and usually does not get home until 6:30 PM. With so many things going on and changing week to week, it can be difficult to make healthy meals that both of us will enjoy.

Cue my "Four Day Dinner Challenge." I want to prove to myself that I can make dinner for an entire school week. I also want to prove to myself that I can find time to try out a new recipe instead of tacos and chicken alfredo on repeat. Here's my menu:
-Monday: Mexican stuffed peppers
-Tuesday: Crockpot pot roast
-Wednesday: Summer vegetable stir fry
-Thursday: Crockpot buffalo chicken

I've already gone grocery shopping and made my first meal. I've never made pot roast before so this will be a learning experience for me.  All of my recipes here so busy teachers like myself can enjoy a quick, yummy meal too!

Mexican Stuffed Peppers
This is a play on stuffed peppers I remember eating as a child with tomato sauce, rice, cheese, peas, and chopped meat. I'll make stuffed peppers whenever I have extra chopped meat leftover or peppers are on sale. For this recipe you'll need:
  • 2 bell peppers (I like to make sure they can stand on their own; any color)
  • At least 1/2 lb. ground turkey (You can also use ground beef/chicken)
  • 1 cup of shredded cheese (I used cheddar but whatever you have on hand will work)
  • Onion and minced garlic (to taste)
  • About 1/3 cup of salsa
  • Taco seasoning (1/2 package)
  • Sour cream (to taste)
Preheat your oven to 350 degrees. Clean out the center of your peppers by cutting the tops out, creating a "bowl." Add the peppers to a large pot of water and let the water begin to boil. Once the water has begun to boil, peppers should become slightly cooked through. Be careful because you do not want them to become "mushy." Once peppers have reached the desired consistency, drain the water and leave peppers to cool. Remember, they will continue to cook in the oven.
You should clean out your peppers before boiling. But if you forget, the seeds will come out on their own!

Over medium heat, brown ground turkey (or meat of choice) with garlic and onion in a skillet. Drain meat after it's been browned and add taco seasoning. Lower heat to a simmer and stir occasionally so seasoning is distributed evenly.


Since I will need ground turkey for my stirfry on Wednesday, I made 1.25 pounds of ground turkey and removed half of it before I added the taco seasoning. Life is all about shortcuts!

Here's where I cheated took another shortcut. I normally will make white rice on the stove. However, tonight was not the night I wanted to wait 30 minutes for rice to boil. Cue Uncle Ben's 90 second Spanish style rice. I threw it in the microwave for 90 seconds. Once the rice was cooked, I added it and some salsa to my seasoned ground turkey.
I allowed the mixture to simmer and then began to stuff my peppers.

I prefer to use this little 9x9 cake pan because I'm working with what I've got but I've also seen Pyrex dishes used. Basically, anything with raised sides that's oven-safe will work. I also prefer to line my pan with aluminum foil because it's less clean up time ;) Spray with some cooking spray. Make sure your peppers can stand on their own.

Fill your peppers. I prefer using a large spoon to scoop my filling into the peppers. In between layers, I like to sprinkle in some cheddar cheese.
I usually add a cheese "hat" to the top of each pepper so the cheese will melt over the top of the pepper. Let's face it, the more cheese the better!

The finished product. I choose to top mine with sour cream.

Dinner is served, teachers!

What's your favorite go-to recipe?

Sunday, August 24, 2014

Post-It Crazy--The First Week of School

Last weekend I couldn't figure out why I was so nervous for the first day of school. I mean, genuinely nervous. I laid awake at night on Friday and Saturday anxiously anticipating Monday and running through every disastrous outcome I could think of. Then I realized it...I haven't experienced the first day of high school in over 6 years. I wasn't present at the first day of school last year because I was finishing up my last 2 weeks as a probation officer. Although I spent all weekend planning and preparing, I still felt completely unprepared and not ready. It didn't help that any time I ran into a "veteran" teacher, they shared my same feelings. I went to bed on Sunday and before I knew it, I was getting out of the car at school. Ready or not.

I have to say, I was nervous for no reason but if I hadn't felt nervous then I would have attributed anything that went wrong to a lack of preparedness and my overconfidence. I teach 6 classes but teach 3 block classes which means that I see my students every day for 2 hours because I am their English and Reading teacher. That means I only have to remember 75 names and I am lucky enough to get to know my students more than a teacher that only has their students for a single subject (in my opinion). This year I am teaching 10th grade and last year I taught some 9th grade classes so I am also fortunate enough to have some of my students for a second year. I have to say, so far  I am pretty impressed by my students. For the most part, they are respectful, hard-working, and have even managed to make me laugh a few times already.

This year, we changed our school schedule as well as our lunch schedule which amounts to mass confusion during the first week of school for everyone. As a result, I didn't want to overwhelm my students with a ton of English and Reading assignments because they tend to not enjoy those subjects and I figured mass chaos would be a good time to take advantage of getting to know my students. On the first day I had my students complete a Student Information Sheet, Reading Survey, and Learning Styles Inventory. They broke into groups (based on their Learning Style) and received a sheet with tips to help them study throughout the year. Then they discussed their tips in groups.

My favorite part of the first day of school lesson was an idea I had seen on Pinterest which was intended for elementary school. I modified the idea to fit my needs and the results completely exceeded my expectations. It was much better than any Student Inventory I had seen. Plus, the results will hang in my classroom year-long as a reminder to myself and my students of the goals we had set in the beginning of the year.

What you'll need:
-3 pieces of chart paper (I prefer the Post-It ones)
-Enough Post-It's for each student to have 3
-Markers
-A designated area in the room to hang the chart papers

I came up with 3 unique questions on my own. I picked these 3 questions because I actually wanted to know what my student's answers would be:
-What do you need to learn or work on to be successful in Reading and English?
-How can Ms. Makowski help you to be successful this year?
-Set 3 goals that you want to accomplish this school year.

I was very careful about how I worded the questions because I wanted my students to feel like they had the freedom to write about whatever they felt but at the same time, keep their answers directed. I told my students that the 3 goals could be about anything ranging from my class to a team they are on to something that is not even related to school


When school was over, I was so excited to read the answers on each chart. I was very impressed and surprised. Plus, I felt like I learned some really good information and whenever I lose sight of the goal or need inspiration I can go and look at my student's answers. Here are some of my favorites:
Set 3 goals for this school year.

How can Ms. Makowski help you?

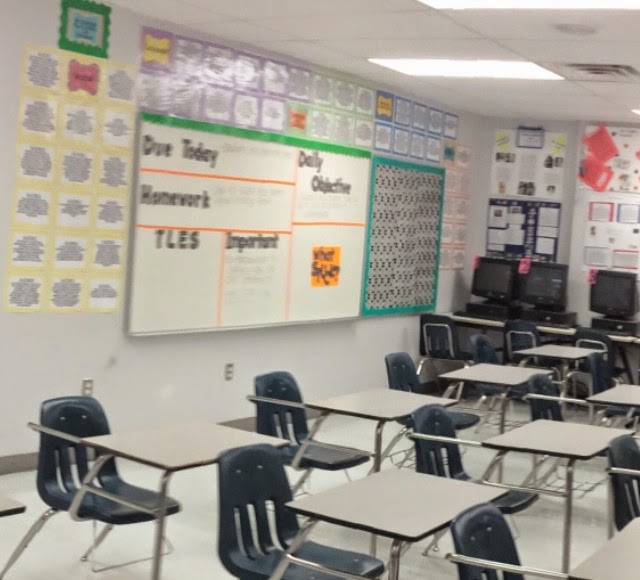
I think I'll be able to use this same method throughout the school year for many different things. As a matter of fact, I've already found another way to incorporate Post-It's into my classroom. I have added a "What Stuck?" element to the dry erase board in the back of my classroom. This dry erase board is where I post the Daily Objective, Homework and Classwork assignments, Important Information, and student field trip dates. "What Stuck?" is going to be used as an exit ticket on Friday's. Students will receive a Post-It at the end of the lesson to write down one thing that they learned from the lesson that will stick with them from now on. 
Again, I was impressed by the results. Students were eager to post their answers and the answers ranged from things we had discussed on Monday all the way until that day's lesson. I was able to determine whether or not my students had retained information from the week. I think in the future I might also create a place for students to post questions that they still have (a "parking lot" but I want to come up with a different name). I am already working on a place for student's to post examples of figurative language when they find them in their independent reading novels.

How do you use Post-It's in your classroom?

Friday, August 22, 2014

Back to School

I've been slacking on posting to my blog because it's been a crazy two weeks. Back to school has completely consumed my life and I'm eating, breathing, and sleeping anything that has to do with high school. I wanted to make sure I gave myself at least some time this weekend to blog about Back to School. Here's a timeline of events.

August 5th: Have a meeting at school & pick up keys for my classroom. Take a sneak peak at my room. Everything appears to be as I left it.
The walkway to my portable.


Okay, maybe it looked a little bit worse than I remember.

August 6th: Begin moving ALL of the class materials I had in the guest room of my house into my classroom. Take a break and go to a meeting. During the meeting I ask our school's IT guy to check the computers in my room so that they will be up and running for Back to School. IT guy tells me he found mold in my classroom over the summer and I shouldn't be in there. I ask IT guy why there isn't a sign. I return to my room to check and sure enough find green mold all over my student desks. Go home grumpy.
Going home.

August 7th: Stop in my classroom to pick up some things. While I'm in there, the sign is placed on my door. I am later told that my room was a "petri dish all summer" and the district was supposed to be out last week to clean my classroom but it should be happening "soon." Go home sulking.

Advanced warning not necessary.

August 8th: District comes to clean my room. Classroom is cleaner than ever!!!! I spend 5 hours with my dad's fiance's wonderful daughter setting up my classroom. I decide to take a break over the weekend.
She is just as OCD as I am with straight lines & organization.

August 11th-August 15th: Pre-school week. Meetings. Trainings. Finish classroom and planning for first week of school.

My desk.
My "area." You can see my Teacher Tool Box on the shelf & all of my organized binders :)
My quote wall and my Student Station where students pick up their daily warm ups, absent work, get missing work slips & fill out the Missing Work binder.
My dinosaur computers & projects from last year's "To Kill a Mockingbird" unit.
My "Wildcat Best" wall where exceptional student work will be hung. My bins where student work is turned in. Independent Reading Journals and Writing Portfolios organized by period.
The Information board. Surrounded by the common core standards for ELA grade 10.
My finished product! 

August 18: First day of school!

I'm hoping to post on Sunday night about my first week of school, including the curriculum and tools I've used. I was so nervous about my new students and how they would adapt to my classroom rules and procedures but so far absolutely everything has turned out even better than I expected. Plus, I've received overwhelming positivity from finding out that I have students that I had in 9th grade last year to finding out that my seniors last year have been accepted to college and even positive feedback on my first week of lessons from my new students. I can tell that this year is going to be a great one!


Sunday, August 3, 2014

Sterilite Saves the Day

I'll have to admit, I've always hated those stupid plastic bins. You know the ones I'm talking about...they're a cheap, ugly storage solution to any clutter whether it's in your home, garage, classroom... When I was in college I refused to buy them and tried desperately to find any alternative storage solution that would be cute. Cue the kindling of my love for those stupid plastic bins. I've found a quick, easy way to make them super cute and resourceful.

You'll need:

  • A ruler
  • Scissors
  • Scrapbook paper (cute ones to match your color scheme)
  • Double-sided scotch tape
  • Sterilite containers (comes in many shapes and sizes)
My journey began at The Container Store (if you haven't been I suggest you GO if there is one near you or at least visit their website) it changed my life and it will change yours too. Think of it as a Bed Bath & Beyond if all they sold was organizational items for every facet of your life. The only problem was everything I wanted for my classroom was way more pricey than I wanted to spend for my classroom (images of things getting lost, damaged, broken). I bought two Command hooks for $3.99 and made a mental note of this magical place for housewares then continued on to Target.
The Container Store has a 20% off sale going on right now. Look how adorable these containers are! BUT they sell each drawer individually and the large ones I needed were $14.99/drawer. 

At Target I needed a ton of bins. Luckily I had a Cartwheel which took 10% off of Room Essentials Storage bins. However I caution you to READ the labels because right now Target is carrying Room Essentials storage bins and Sterilite storage bins. The Cartwheel only applies if it says "Room Essentials"...tricky.

This bad boy is good until 8/15!
Learn more about Cartwheel here.

I wound up buying these:

Target also has a mobile coupon right now for $5 off a $25 back to school purchase. Text SCHOOL to 827438.

After you have your bins, measure out how long and how high your bins are and cut your scrapbook paper so they fit nicely in the front. I used my scrapbook stickers to spell out what was inside of each bin (so far I've only needed 4 sheets to spell out everything for my toolbox and storage bins). Use double sided tape to adhere each label to the front of each bin. These labels are easily interchangeable as your need for them changes and add some style/functionality to cheap storage solutions.

The finished product:


This final bin will be used for our class Independent Novel Journals which will be featured in my next blog post. Stay tuned!


With 15 days left until the First Day of School, please tell me I'm not the only one who is having trouble sleeping?!?!